welcome to my culinary adventure


Leave a comment

Date, Pecan, and Chocolate Chip Blondies

Hiii guuuys,

Image

DISCLAIMER: this post is sassier and more sarcastic than usual. Don’t know. Bear with me.

Soooo I’ve had this box of medjool dates in the fridge for a while now and aucune idée what to do with them. Dates are wonderful, but to be honest, I’ve never really baked with them before. Or cooked with them. Yeah okay, I have very little date-experience (hahaaaaaa ha). Anywaaaays, ahem, I kept thinking about making some sort of raw Larabar/energy bar/raw healthy treat kinda deal with them and my new ~FOOD PROCESSOR~ (!!!!!) since they’re “nature’s natural sweetener” and “soooo nutritious” and all but just meh. I want something sweet and yummy and not healthy. Or at least, not masquerading as such. And I did not want anything “no-bake”. No-bake, no-fun, am I right?? (…) Basically what I’m trying to say is, I was in the mood to put something in the oven, smell it baking, and use all the willpower in the world to resist cutting into it before it cooled enough. So that’s exactly what I did. And ooooh was I happy with the result. (And oooooooh did these smell good while they were baking.)

This was an experiment gone awry wonderfully well! Since when does that happen ever?! I’ve been experiencing some odd health things lately (meh) but my doctor recommended I try to eat gluten free for a little while just to see if I respond well to that. Maybe I have some weird kind of food sensitivity, who knows. I blame my Paris bread-binge. Anyways, the point is, even as a temporary experimental trial-run kinda thing, being gluten free is HAAARD. I don’t even eat bread that much, but suddenly when I’m not allowed to have it, it’s all I want/think about/crave/yearn for. Okay maybe that’s a little extreme (or is it???) but honestly, for all you gluten-eaters, think about how many things have flour in them. Now, think about not being able to eat them. Tortillas. Cake. Sandwiches. Pizza. Mkay I have to stop before I start crying. But YEAH. Rough. Anyways, this means I’ve been getting creative with my baking. Just because all these things I’ve been making are gluten free, doesn’t mean they’re not just as delicious–perhaps even more delicious, I might venture to say (gasp!)–than their gluteny counterparts. These are pretty wonderful, guys. And like my brownies, they’re made with pretty snazzy ingredients. But don’t fret, friends, they do not taste “healthy” in the slightest. Truuust me.

1 1/2 c. almond meal/flour
1/2 tsp. baking soda
pinch of salt
1/2 c. coconut sugar
1/4 c. coconut oil, melted
3 eggs
1 Tbsp. vanilla
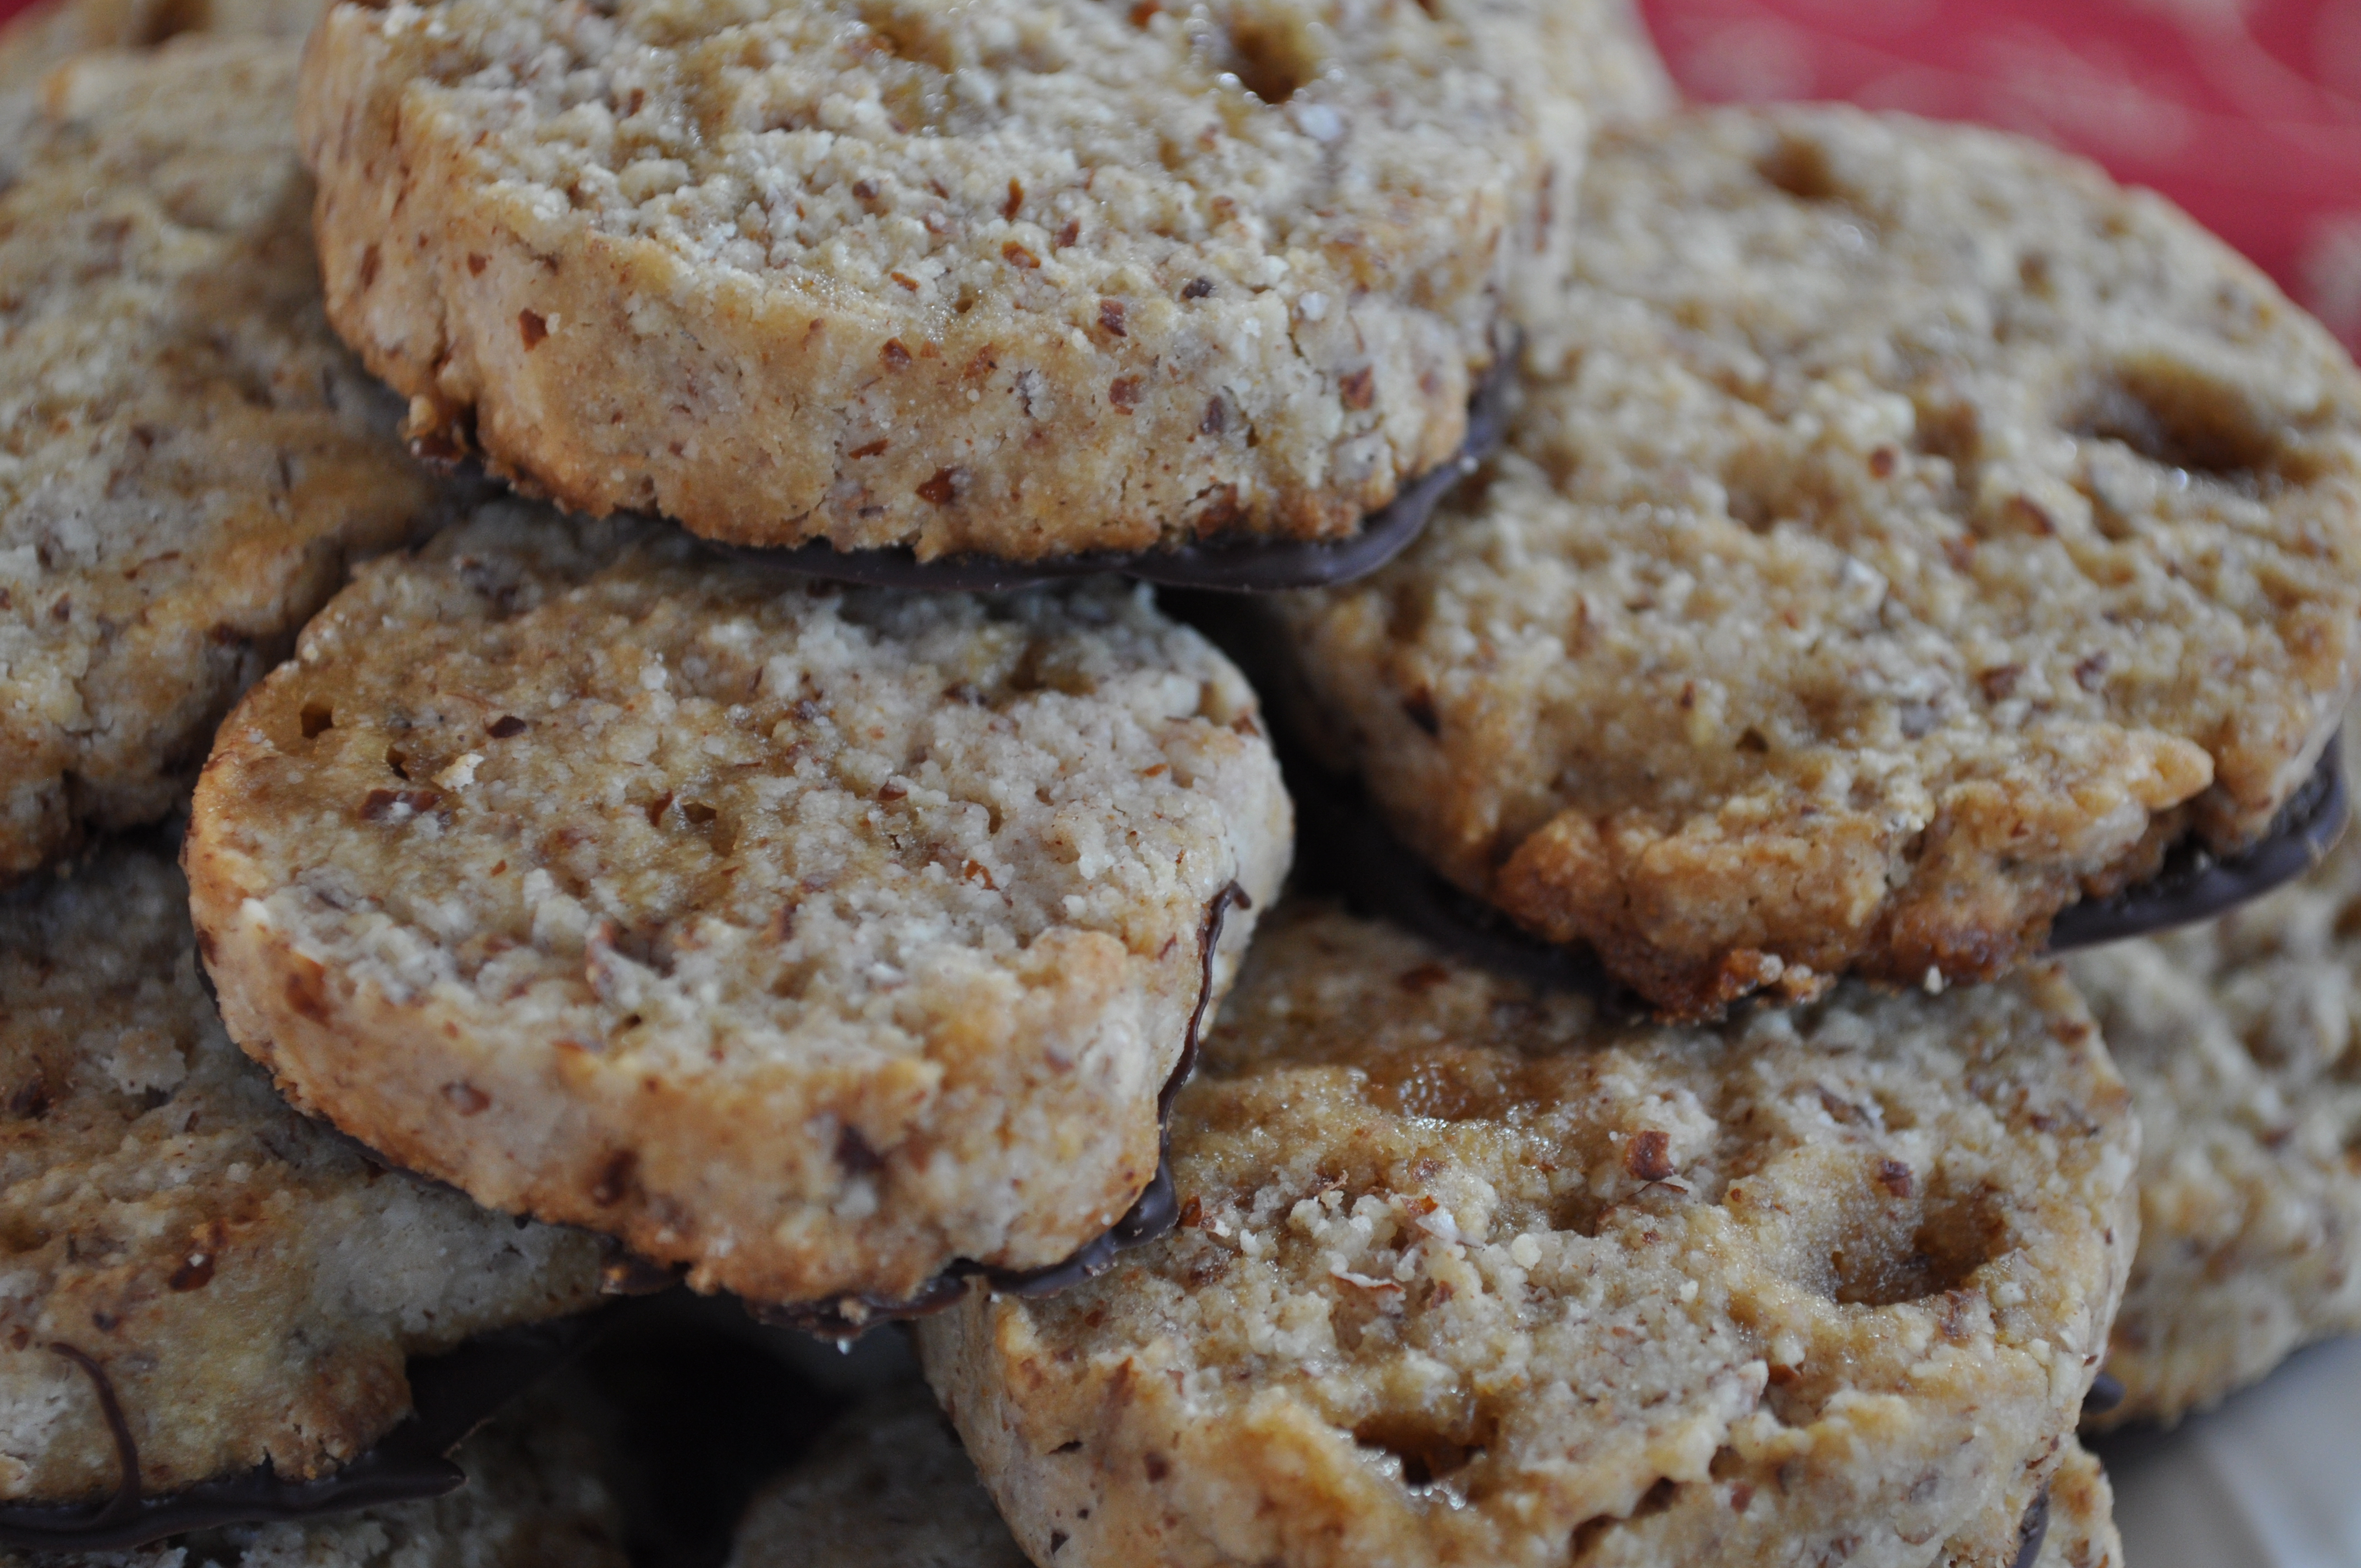
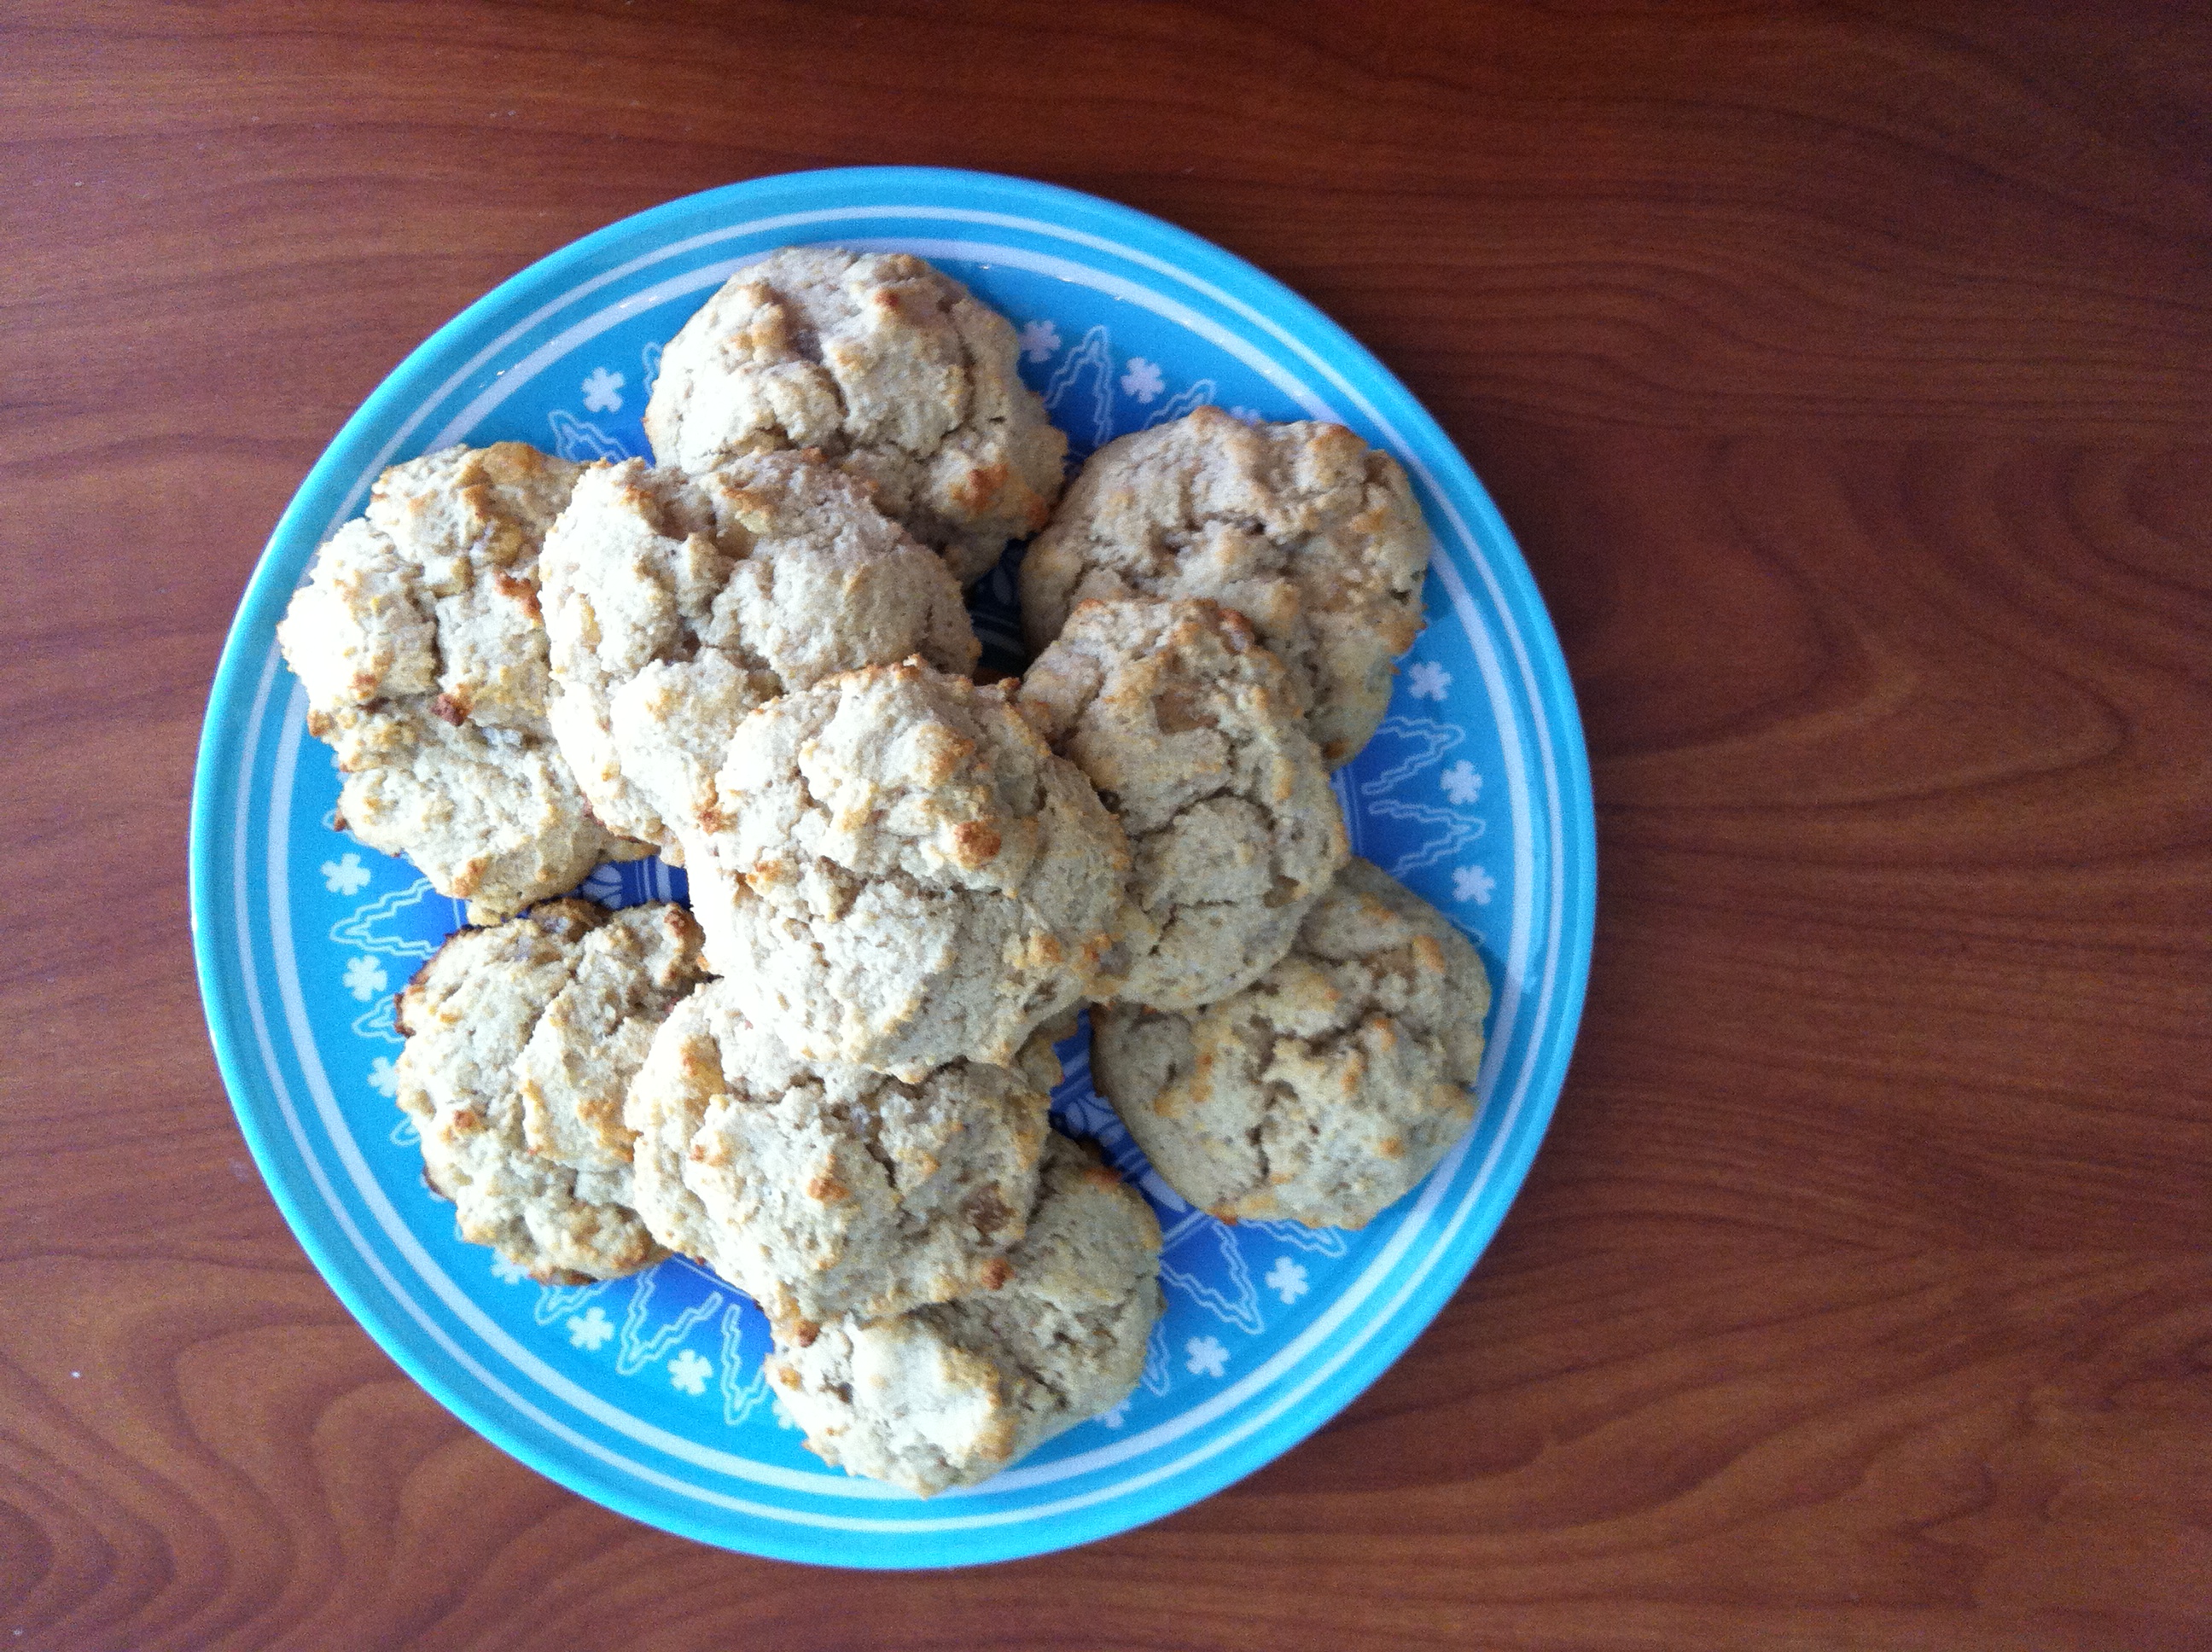
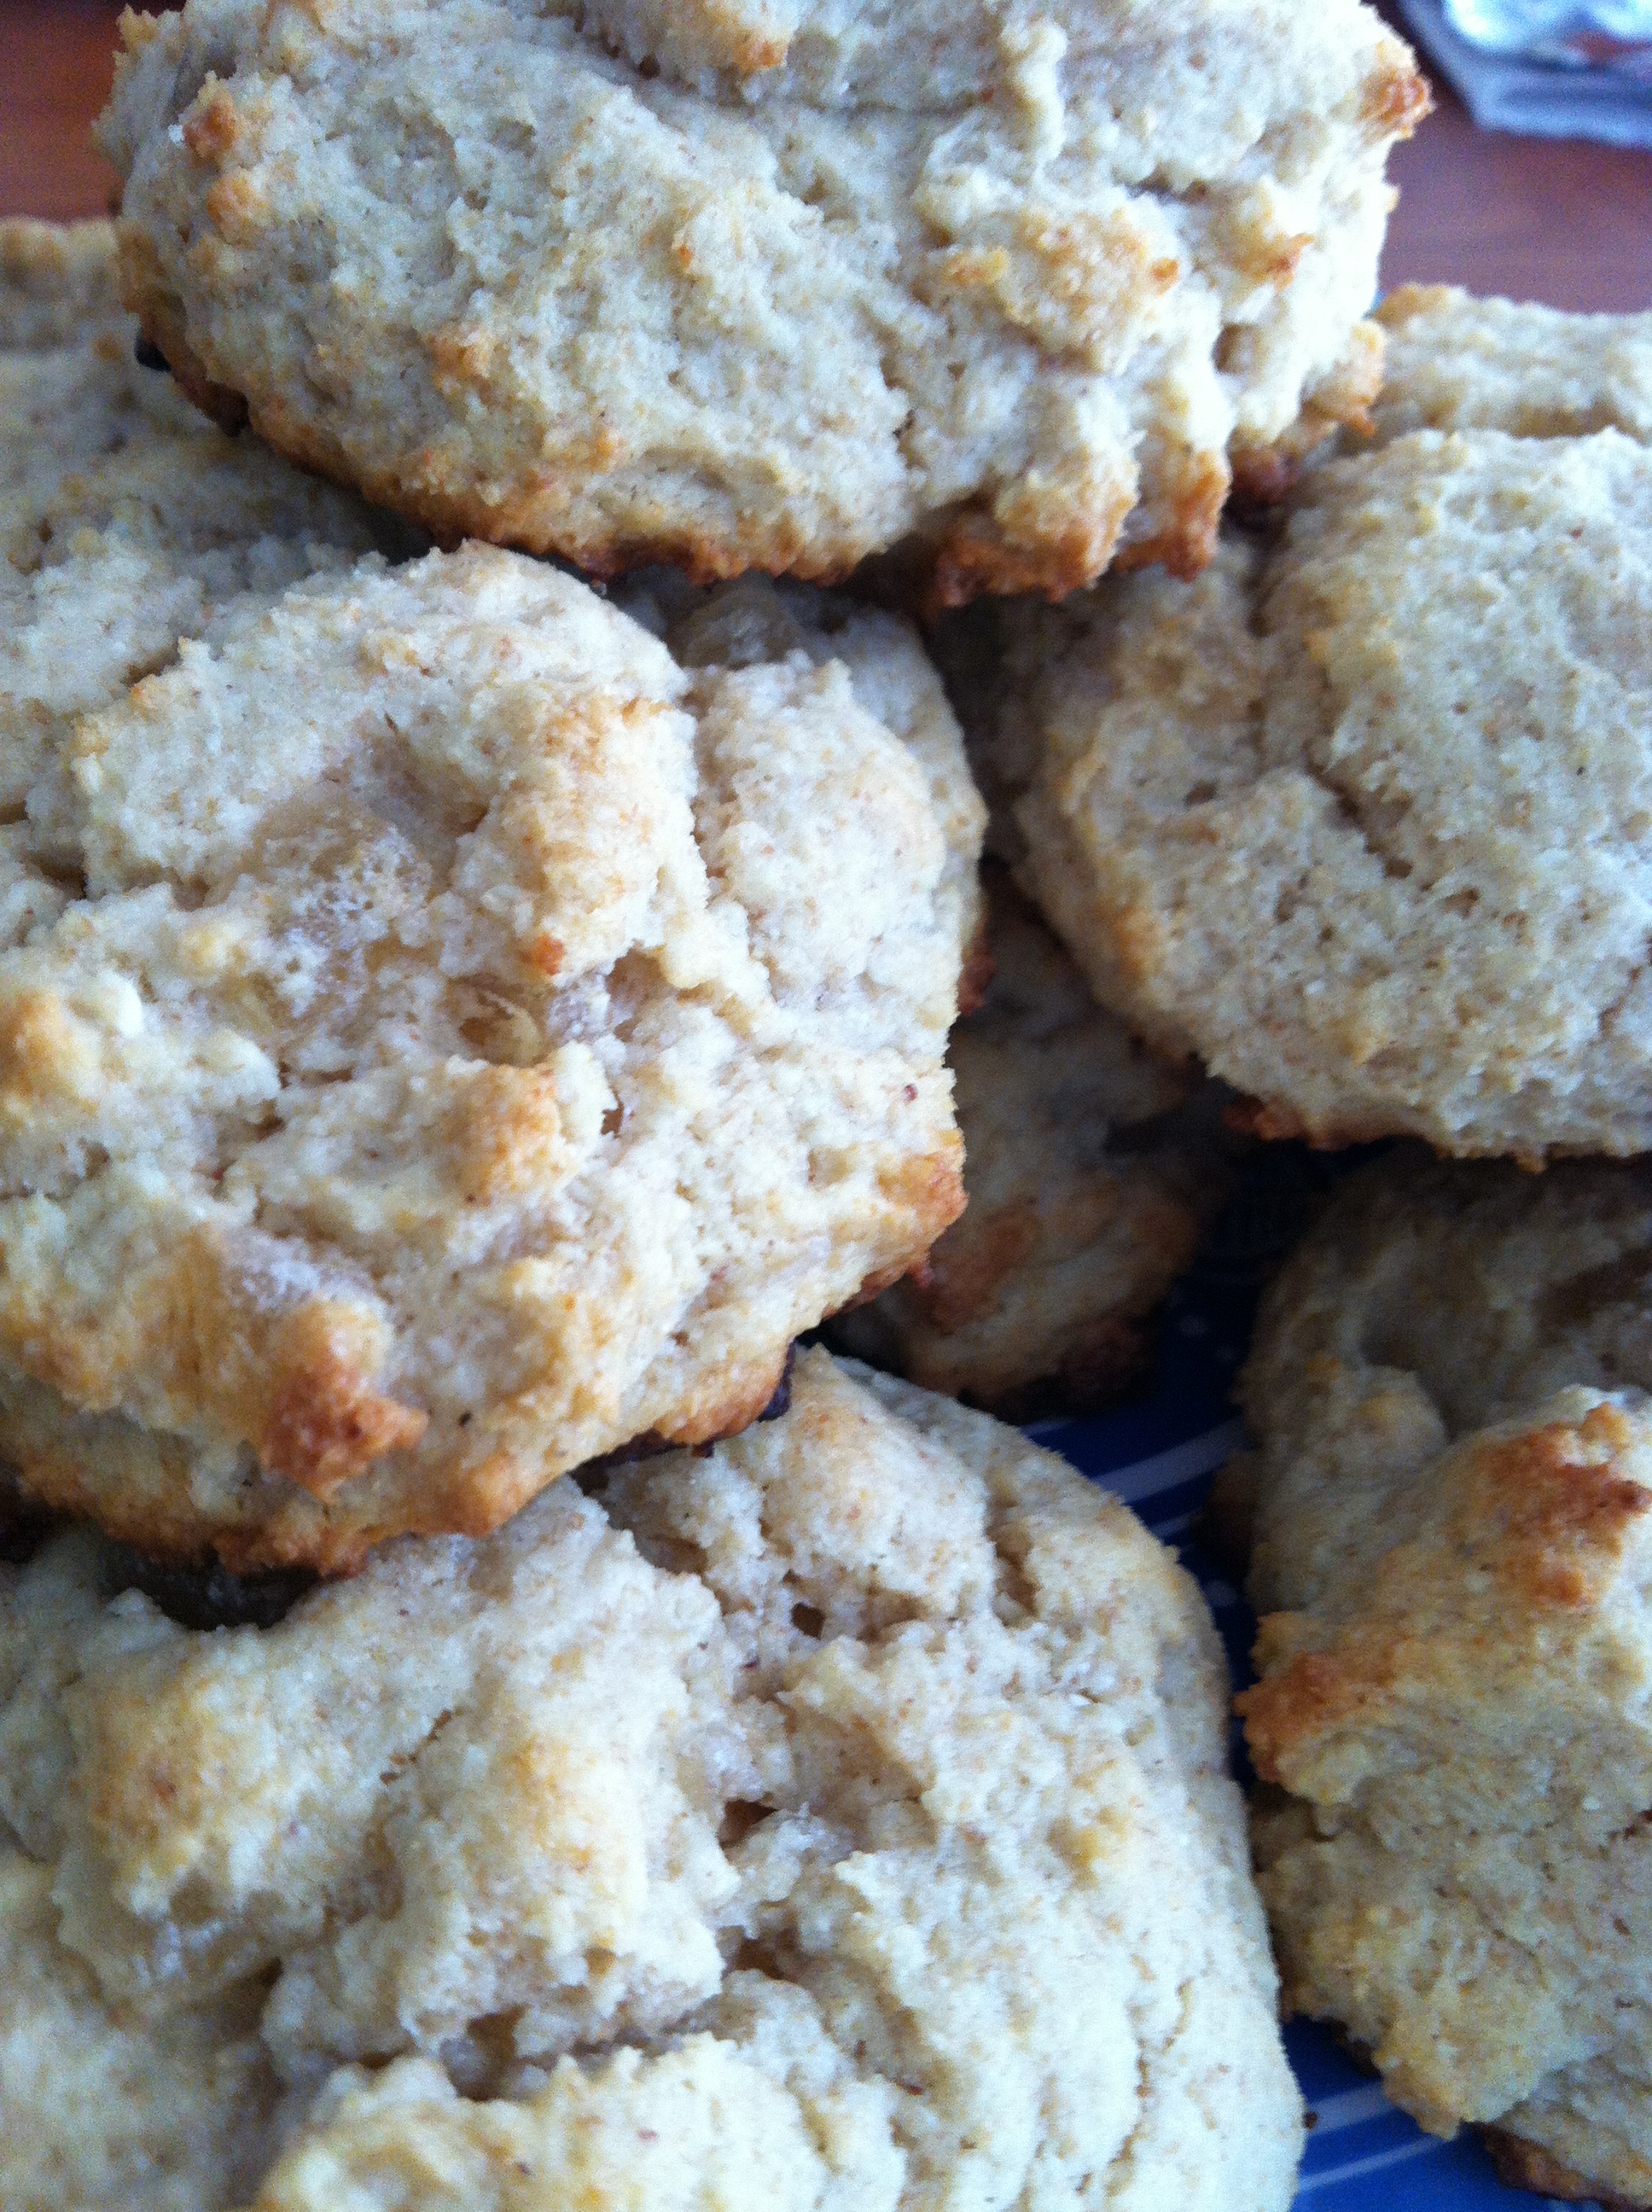
1 c. dates, pitted and chopped
3/4 c. semisweet chocolate chips
3/4 c. pecans, chopped

Preheat the oven to 350°, grease an 8×8″ pan with your oil of choice (coconut oil hollaaaa), and set aside. Sift together the almond flour, baking soda, coconut sugar, and salt into a bowl. In a separate bowl, mix together the wet ingredients (eggs, coconut oil, and vanilla) and stir the two mixtures together. Gently fold in the dates, pecans, and chocolate chips and evenly spread into the pan. Bake for about 20 minutes until edges are lightly brown and toothpick inserted into the center comes out clean. Let cool. Dig in.

Image

Image

Image

So can someone hire me to be the in-house baker at their adorable little (but sometimes snobby) NYC coffee shop yet or what? I can bake trendy things! And they’re delicious! And I need a job! Lol jk I wish okay bye going to stop writing before you all hate me and refuse to read my blog ever again </3

Love, Emily


1 Comment

Dark Chocolate Brownies with Coconut Cream Cheese Frosting

Hello my friends!

Image

I’m baaaack in the US and I could not be happier to be reunited with my kitchen. I have been cooking/baking up a storm since I arrived.. Most of my kitchen adventures have been experimental though–some of which have turned out not-so-amazing–which is why this is my first post back. Also I’ve been back for weeks and I haven’t written anything yet ooooops. It’s just so easy to put off sitting down and writing a blog post. But I’ve now made 2 amazing things that I absolutely MUST SHARE; they’re tears-in-my-eyes good (brownies now, blondies to follow). I’m nearly drooling just thinking about them.

Apparently I’ve been on a cookie bar kick, which is odd since I rarely make things like brownies or blondies. These brownies were for Father’s Day (eep that was a long time ago and I’m just writing this now oooooops) which apparently I’ve accidentally made an annual tradition. These were better than last year’s though. Different, for sure, but better. These ones were also flourless (see first ever blog post for other recipe), but these were definitely a little more exciting. I took my dad’s love of the deepest darkest chocolatey thing you could imagine, combined it with his love for coconut and his request for a cheesecake for Father’s Day (after I’d already started making brownies…oopsies sorry!) et voilà, I came up with this lovely little combination of GLUTEN FREE (if you’re into that) dark chocolate brownies with a coconut cream cheese layer and topped off with a semisweet chocolate shell. Shell? Glaze? Top layer? You get the point. There’s chocolate on top. In other words, yum.

I got the idea from this recipe for buckeye brownies, but I left out the peanut buttery layer and added my own twist. These were great. Make ’em.

Brownies :

3 oz. 100% cacao baking chocolate, melted (<3)
1 c. coconut oil, melted
2 1/2 c. coconut sugar
4 eggs
12 tsp. vanilla
3/4 tsp. salt
1/2 tsp. cornstarch
1/3 c. plus 1 Tbsp. cocoa powder
2 Tbsp. almond meal

Coconut Cream Cheese Frosting :

2 c. shredded coconut, processed to coconut butter
4 oz. cream cheese, softened

Chocolate layer :

8 oz. semisweet/dark/whatever chocolate
1/2 tsp. coconut oil, melted

Grease an 8×8″ pan and set aside. Preheat the oven to 350° as per usual.

Combine the melted chocolate, melted coconut oil, and coconut sugar together in a bowl. Add the eggs one at a time, mixing between each egg. Add the salt and the vanilla and mix again. Sift the cocoa powder, cornstarch, and almond meal together in a small bowl and add to the wet mixture. Once combined, pour the batter into the prepared pan and bake for about 30 minutes until a toothpick comes out clean when stuck in the middle. Set on a cooling rack and step away from the brownies so you can make your next layer. Maybe even stick it in the fridge so you’re not tempted (that’s what I did).

Process the dry, unsweetened coconut in a food processor until the oils are released and it turns into a spreadable consistency. Add your cream cheese and pulse until combined. Spread this “frosting” over the cool-ish (but mostly cool, please!) brownies and prepare for the final step (!!!)

Melt the chocolate for the top layer and add the coconut oil. Pour the chocolate evenly over the top of the coconut frosting layer. Stick it in the fridge until the top layer sets, cut into them, take a bite, die of happiness. Repeat.

Image

It feels good to be back :’)

Love, Emily

PS: OOH ooh also forgot to mention that yeah, these are brownies, so they’re sugary and rich and the definition of decadent, but all the ingredients are healthy and natural and wonderful in every way. No refined sugars! No flour! Etc! So you can feel a little less guilty eating them. Right? (Hear hear!)


Leave a comment

Bonjour (and simple quinoa bowls for two)

Coucou !

Image

It’s been a while. I am in Paris. These are the some of the fresh, amazingly beautiful things I picked up from the marché biologique (organic market!) that takes place every Saturday morning a five-or-so minute walk from my apartment. After the market, I stopped at my neighborhood boulangerie for a pain aux céréales (essentially, a wheaty/seedy baguette) for my after-dinner cheese course that I can no longer live without. Essentially, I am living my dream life right now.

But in other news: hi! I haven’t posted once in 2013. Hello, friends, hello. I am alive! Quick updates: I am studying abroad here in France this semester and I could not be in a more ideal foodie-paradise. I kid you not when I say I practically cry tears of joy every time my waiter brings me my dish at a restaurant, I take a bit of bread/cheese/yogurt/pastry, etc. The French really do food and they do it well. I have been hardly cooking at all (no, the occasional omelette, tartine, or muesli bowl do not satisfy my NEED to be cooking) and it has been really, really hard for me. I mean really hard. I live with a host family of six sooo, needless to say, I very rarely get access to the kitchen. Even when I do, it’s generally a “quick! fry an egg, slice some avocado and get out ASAP!” situation as to stay as out of the way as possible. The French are very particular about their kitchens; they do not really love other people messing around in them so much. They also take a lot of pride in the food they prepare. If a French person makes you food, I would recommend you take seconds. Oh, and you better compliment it.

All that being said, I’m pretty sure I’m meant to be French. My constant food-obsessing and preference for fresh, well-made things that has been deemed as “food snobbery” on many occasions back home is pretty much the standard here. So, essentially, I’ve found my home. I may never leave.

As much as I absolutely adore nearly all French food (notice how I say nearly all–I’m pretty sure I could live without the pigs feet, pigeon, pâté, and things like that), sometimes I just need light and fresh. And maybe not cream-based, for once. Which brings me to my very loosely (emphasis on “very”) bibimbap-inspired quinoa bowls! For 2 servings, do as follows:

Image

2 fresh eggs

1/2 cup dry quinoa of your choice, rinsed and cooked

1 small courgette/zucchini, thinly sliced

6 (approx.) shiitake mushrooms, thinly sliced

1-2 Tbsp. olive oil

1 clove garlic

Salt and pepper to taste

(1/2 avocado, sliced and not pictured, oops!)

First of all, prepare your quinoa and set aside. Fry up your eggs and do the same. Heat up your olive oil in a pan on medium, mince your garlic, and add it to the pan, sautéing for about a minute or so. Add your zucchini and mushrooms to the pan and continue to cook for about 2-4 minutes until they’re soft, constantly stirring. Salt and pepper your veggies to taste. Put your quinoa in 2 bowls, add your veggies, put your eggs on top, et voilà ! If you’re feeling really adventurous, slice up an avocado and put it right on top. I did this as an afterthought post-photo-taking, and I’m really glad I did. Although that might just be because I have a borderline creepy obsession with avocados. But you already know that.

Now, if I were to do the more committed version of this (and by that I mean what I wish I had done/what I would have done if I wasn’t feeling quite so lazy), I would’ve poached my eggs and added thinly-sliced carrots to the veggie situation. But, alas. My limited time/resources/patience strike again.

Hopefully I can post again soon. I really have missed my blog. No promises, though! I’m too busy living la vie, you know?

Bisous, Emily


1 Comment

Pumpkin Ground Beef Casserole

Hello friends!

Image

Okay bear with me. I tried to make the title of this post the least repulsive I possibly could, but this clearly proved difficult. I hate the word “casserole”. It grosses me out. I always associate it with heavy, creamy, chunky, lumpy, processed, Campbell’s-soup-based dish–not the most appealing. Unless you’re into that. Which I am not.

Okay let me take this opportunity to go on a rant for a minute: I absolutely HATE it when I come across a recipe somewhere that claims to be “only 3 ingredients!” or “so simple!” and it involves a mix or a premade ingredient. That cake is not made of 3 ingredients. It is made of the 8297 creepy ingredients that no one can pronounce in the cake mix you bought, plus the other 2 you add yourself. If you’re baking/cooking something from scratch, COMMIT, people! Come on! It’s one thing to use a stock something, but to make a casserole with a whole can of cream and mushroom soup and claim that it’s “homemade” just makes me sad.

Anyways! This is the perfect, cozy winter dinner. If I were to live in any given casserole, I would choose this one. It was nice to have an dinner all in one pan. Veggies, protein and bread–all together!

Filling:

1 lb. lean ground beef

1 yellow onion, diced

3 large carrots, chopped

1-2 tablespoons olive oil

Salt and pepper to taste

1-2 cups mixed vegetables (I used corn, peas and green beans…frozen…shh)

2 c. beef stock

1/4 c. pumpkin puree

Pinch of cinnamon, nutmeg, cumin, and cayenne pepper

1/4 c. cornstarch, dissolved in water

Topping:

1 1/2 c. flour

1 c. beer of your choice

1/2 tablespoon baking powder

1/2 tsp. salt

1 tablespoon honey

2 tablespoons melted butter

Heat the olive oil in a pan on medium and cook your onions until they turn clear. Drop in your ground beef and cook until it’s nice and browned. Set aside. In a saucepan, bring your beef stock and veggies (carrots and whatever mixed ones you choose) to a boil and reduce to a simmer. Let this cook for about 10 minutes until the carrots are tender. Once the veggies are done, separate them from the broth–you can put the veggies in with the meat and leave the broth in the saucepan. Add your water-cornstarch mixture and your pumpkin puree to your beef stock, bring to a boil, then back down to simmer again. Stir constantly until thickened, about 5 minutes or so. Season with a generous pinch of cinnamon, nutmeg, cumin, and cayenne pepper. At this point, you should probably preheat the oven to 350 in preparation for the baking of the bread-top. For your beer bread topping, fold all ingredients (except for the melted butter) together in a bowl until combined. Easy as that. Once all your separate parts are done, put the meat and veggies into an 8×8 square pan. Pour the gravy on top, making sure it’s evenly dispersed throughout the whole pan. Spread the beer bread batter over the whole thing with a spatula, pour the melted butter on top, and stick it in the oven for 35-40 minutes or until the top is lightly browned. I would suggest putting a foil-lined cookie sheet under your pan just in case–my casserole was very close to overflowing. Remove from the oven and prepare for the ultimate comfort foodie meal.

Image


Okay so yeah, this took a while. It’s just a lot of steps. But it was definitely worth it! I’d make it again. Also, it makes surprisingly good leftovers. So yeah.

OH also: MERRY CHRISTMAS, foodies! Hope you consumed plenty of deliciousness these past few days (I know I did). In fact, I probably consumed enough cookies for several people my size. Yeah, actually, I definitely did. Without a doubt. That’s what the holidays are about though, right (…)? Recipe for my holiday dessert to come!

Love, Emily


1 Comment

Black Bottom Almond Shortbread Cookies

Hi guuuys,

Image

It’s been so long! I SURVIVED. I say that only half-jokingly–there was a time when I literally thought I wasn’t going to make it. It was a close call, guys. I didn’t sleep much. Ate a lot of granola. Cried a lot, screamed a lot, etc. Now, I’m paying for abusing my body with a fever and so much achey soreness that I am almost completely unable to move any of my limbs. At least now that I’m home I have my bed and an endless supply of tea to nurture me. After finals, moving out of my apartment, and getting home, I can finally relax. My family is happy that I’m home–both for baking/cooking reasons and for other me-being-home reasons. When we’re not screaming at each other, that is. Standard family shenanigans.

Obviously I needed to bake something immediately when I arrived to take full advantage of my family’s FULL-SIZED and FULLY-STOCKED kitchen (what luxury). I’ve been stressed. Baking is my stress relief. It was only a matter of time before I went cooking/baking crazy.

I was actually pretty proud of these cookies. My lovely friend Cheski came over and helped me bake and I just kind of made up the recipe as we went along. They turned out great. A little crumbly, but that’s shortbread for ya.

1 c. flour

1 c. almond meal (blanched might make these prettier, but it doesn’t really matter)

1/2 tsp. baking powder

1 tsp. cinnamon

pinch of salt

1 egg

1/4 c. honey

1/2 c. coconut oil, melted

1 tbsp. vanilla

3/4 c. semisweet chocolate chips (or baking chocolate), melted

Combine your flour, almond meal, baking powder, cinnamon, and salt in a bowl. Set aside. In a separate bowl, whisk your egg until it gets a little light and fluffy (you don’t need to meringue it by hand, just until the yolk and white are fully combined and it expands a little). Whisk in the melted coconut oil, vanilla, and honey. Pour the wet ingredients into the dry ones and fold until just combined–the mixture should be a little crumbly. Form into a ball in the bowl (if you want to use your hands for this part, by all means, go for it) and stick it in the fridge for at least 30 minutes. When you stick it in the fridge, preheat the oven to 350. After you remove your chilled dough from the oven, roll into a cylinder in wax paper. With a sharp knife (to avoid crumbling), slice your cookies about 1/4″ thick like those terrifying but wonderful slice-and-bake holiday cookies you buy at the store. Place on a lightly greased cookie sheet and bake for 15-20 minutes until the edges are lightly browned. Take them out and let them cool for a few minutes on the cookie sheet before very carefully transferring them to a cooling rack. Melt your chocolate chips in the microwave, stirring between 30 second intervals until fully melted. Use a spoon to spread a thin layer onto the bottom of your cookies once they’re cool enough, place on a cookie sheet lined with wax paper, and refrigerate until they’ve set.

Image

Image

Aren’t they beautiful? I highly recommend eating these with tea or coffee. They’re like little tea biscuits! They make me feel proper and British. Kinda. These are nice, simple holiday cookies without overdoing it on sweetness. I recommend ’em!

More holiday goodness to come, I’m sure. Just you wait.

Love, Emily


1 Comment

Maple Cinnamon Granola

Helloooo friends!

Image

Ohhhhh my god. Oh my god. Make this right now. This was my first time making my own granola and I don’t know what took me so long. My favorite muesli from Trader Joe’s was out of stock yesterday when I went grocery shopping and, although at first I was devastated, it made me realize I have a ton of perfect granola-making supplies in my cupboard and I should just do it myself! I need granola for finals. Need it. It’s my go-to “I don’t feel like preparing a real meal right now” meal that’s sufficiently healthy-ish (kinda) while still being snack-y. I promise you I will be on a granola-binge this week as a result of all the finals/move-out/end of the year stress that I will be experiencing. At least now I’m sufficiently prepared.

I just ate a bowl of this nutty, oat-y goodness with milk and sliced bananas and I’m fairly sure I will never be quite the same. This was SO EASY and it’s SO YUMMY and it made the apartment smell like cinnamon and maple syrup. I’m back on my breakfast binge, ladies and gentlemen. And I don’t even regret it. Yet.

3 c. old fashioned oats

1 c. coconut flakes

1/4 c. maple syrup

2 Tbsp. agave nectar (or honey!)

1/4 c. coconut oil

1 1/2 tsp. cinnamon

1/2 tsp. nutmeg

dash of salt

1 c. mixed nuts, chopped (I used cashews, peanuts, walnuts and pepitas)

1 c. dried fruit (I used mixed raisins)

Preheat the oven to 350. Line a baking sheet with tin foil and set aside. In a large bowl, mix everything but the dried fruit–but including the coconut, of course–until everything is sufficiently coated. (You may need to microwave the coconut oil for a few seconds to make it liquid-y.) Spread the mixture on your cookie sheet as evenly as possible. Stick it in the oven for 15-30 minutes (I do realize this is a big range, bear with me for a second), stirring every 5 minutes or so to make sure everything gets evenly toasted. Let it cool completely before stirring in your dried fruit and storing.

I only left my granola in the oven for about 20 minutes or so, but I’ve seen recipes say to leave it in for as long as 45. I checked mine every 5 and it seemed like the edges were nearing their toasty peak by the 3rd time I checked, so I re-stirred and took it out soon after. I’m sure a lot of it has to do with your oven–just don’t make this when you absolutely must be otherwise occupied since you’re going to have to check it. You definitely wouldn’t want your precious granola to burn.

This goes without saying, but you can obviously use whatever ingredients you’d like in your granola. If you don’t like coconut or something, omit it. If you’re really into dried cherries, add ’em. I bet you could make a really awesome banana-y granola using ripe mashed bananas. Or you could even add cocoa powder. Whatever you’d like, really! I’ll probably try more varieties and keep you posted.

For everyone who’s crazy busy right now: hang in there! You can do it! Make some granola, it’ll make you feel better.

Love, Emily


Leave a comment

Cinnamon Honey Ricotta Toast

Hi all,

Image

Okay this probably doesn’t warrant an entire “recipe” post but it was honestly so delicious I couldn’t help but share. It was the perfect pre-work breakfast. Quick and easy. Also, new and exciting! I always love a fried egg on toast (eggz 4ever*~), but it’s always nice to change things up every once in a while. This is a nice, sweet breakfast without being one of those “let’s put you in a sugar coma with obscene amounts of butter, powdered sugar and syrup!” kind of breakfasts.

The past couple days have been UTTER MADNESS. I am borderline out of food, so I’m relying more or less on breakfast foods and snacks for survival. I have to make it two more days before I replenish my grocery supply. I must survive! Yesterday for breakfast breakfast, I had these pieces of toast and a cup of coffee. For lunch breakfast, I had a granola bar and a gingerbread americano. Linner breakfast: a yogurt parfait. Dinner breakfast: a bowl of muesli and a banana. See? I wasn’t kidding. Breakfast for every meal. Plus there are those delicious scones that I made the other day that–although extremely delicious–add even more to my breakfast binge. My first non-breakfast type dish in literally 3 days was tonight when I finally broke the streak with chicken and broccoli (shoutout to Jade for providing the chicken, otherwise I would still be stuck in breakfastland). Don’t get me wrong, I LOVE breakfast foods. Adore them. They’re probably my absolute favorite, in fact. I never thought I would hear myself say this, but I really did get kind of sick of eating breakfast for every meal (gasp!). Really though! How many times can you eat eggs, yogurt, or some form of granola before it gets old? 72 hours is my limit, apparently.

1-2 slices of this fabulous wheat bread (or, store bought of course…less exciting though)

Ricotta

Honey

Cinnamon

Toast your toast (shocker), spread as much of ricotta as your heart desires on it, drizzle with honey, and sprinkle with cinnamon. Simple.

I bet this would be great with some slivered almonds sprinkled on top too. Oh, yum. I’ll probably do that tomorrow, in fact. Cannot wait for the morning.

Love, Emily


Leave a comment

Ginger Almond Scones

Hi friends,

Image

Happy Hump Day…….meh. I’m drowning in work/stressful things and I just want to ignore my responsibilities, bake, and eat these scones always. As I mentioned in my previous post, I have lots of baking things to use up before I leave and I had some ricotta in my fridge (but naturally, nothing to cook with…and no eggs…), so ricotta scones it was! These are delicious. They’re wonderfully moist (I hate this word but I had to, I’m sorry) while still retaining that great, crumbly scone texture. The almondy part of them comes from almond flour, which makes them healthier AND adds a nice nutty taste. I cannot wait to get home tonight and eat one with an ice cold glass of milk.

1 c. almond flour

1 c. whole wheat flour

1 tablespoon baking powder

1/4 c. sugar

1/2 teaspoon ground ginger

6 tablespoons cold unsalted butter, chopped into small pieces

3/4 c. part skim ricotta

1/3 c. milk

1/2 c. chopped crystallized ginger

Preheat your oven to 400 and prepare 2 baking sheets by greasing them with coconut oil/whatever you grease things with. Whisk together your dry ingredients (flours, baking powder, sugar, salt and ginger). Add the butter and mix together with your hands until combined into a coarse, meal-y consistency. Once combined, fold in the ricotta and the milk until smooth and eventually add the ginger. Don’t overmix! With a spoon, drop heaping tablespoon-sized portions onto your prepared cookie sheets–you should end up with about 12 scones, depending on what size spoonfuls you end up with. Bake for 12-15 minutes until the edges start to get lightly golden brown. Let them cool for a few minutes before transferring them elsewhere with a spatula. Enjoy!

Image

You may notice the bottoms of some of these scones are a little toasty. I took them out right at 12 minutes and this is how they turned out. They’re not bad; they don’t taste burnt or anything. But perhaps 350 for 15-18 minutes-ish would have been a better call. Not sure. If/when I make these again, I’ll be sure to update the recipe.

Mmmmm I love ginger. I quite enjoyed nibbling on little bits of crystallized ginger as I made these. Delicious.

Love, Emily


1 Comment

No-Knead Wheat Bread

Hello, all!

Image

Wow okay. I was in a dark place before today. I don’t understand how I ever survive without baking. It’s like I didn’t even know myself anymore. I made this loaf of bread and some scones today, and I feel REJUVENATED. Literally like a whole different person. I have a whole lotta baking things to use up before I move out of my apartment in 2 weeks. Okay backtrack:

In case I haven’t mentioned this before, I AM GOING TO PARIS FOR 5 MONTHS. Starting in January, I will be studying at L’Universite de Paris and living with a French family. More or less I’m going to be a Parisian in training. Get ready for some delicious French cooking, friends. Or should I say: mes amis. I requested that I get placed with a family that will teach me how to cook (priorities, I know) so I plan on continuing en France. So you will be hearing from me abroad, d’accord?

ANYWAYZ I’m leaving for home in 2 weeks, which means I’m trying to use up as much of my baking supplies as possible. I have tons of whole wheat flour left, and I was fresh out of bread, so I figured why not!

Back to the topic at hand: bread. I made a no-knead white bread (that you all should try if you haven’t already because it is FABULOUS as well as fabulously easy to make) back in October and I figured it was time for the wheat variety. I used all whole-wheat flour and even though I’ve heard things about how the no-knead method doesn’t work as well for whole wheat as it does for white because it’s a heavier flour, it turned out pretty great! I noticed a little difference just in the density of the bread–this one is a little denser/less light and fluffy, but still delicious all the same. If you’re a whole-wheat-over-white-bread kinda person, try this out. It works quite nicely.

4 c. whole wheat flour

1/2 tsp plus 1/8 tsp. yeast

2 c. plus 5 tablespoons water

2 tsp. salt

Mix together all ingredients in a big bowl until just combined into a dough. Cover and let rise for at least 12 hours (I let mine rise for almost 20–I’d say the longer the better but it doesn’t reeeeally matter). Once it has risen, pull the dough out of the bowl onto a well-floured surface. fold it once, turn it 90 degrees, fold it again, and form it into a round shaped loaf. Preheat the oven to 475 and let your pot and lid heat in there as well for about 30 minutes. After that time is up, carefully remove your pot from the oven, put your dough inside, and replace the lid. Bake for 30 minutes, remove the lid, and bake for an extra 20 with the lid off. Once you take the bread out of the oven, let the pot and bread cool for a while (at least 15-20 minutes) before you even touch it. Once you remove it from the pot, let it cool completely before you cut it. Voila! Delicious Bread!

Image

Now, breathe in the smell of your freshly baked loaf and pat yourself on the back for being such a successful baker. And go make yourself a piece of toast in celebration.

Love, Emily


Leave a comment

Pecan Pie Bars

Hellooooo,

Image

Hi! I feel like every time I write a new post, I talk about how long it’s been since my last one. Yeah. Well. I’m trying! I always have a bunch of things to blog about and no time to actually sit down and do it. But here I am at a slow day at work, with plenty of time to devote to my Thanksgiving posts.

For Thanksgiving I traveled (by way of a 7 hour long bus ride from hell…but that’s a different story) to Boston to visit a friend for an extremely low-key, two-person Thanksgiving. Now to be quite honest, Thanksgiving for 2 people is hard! I know how to make this kind of food in vast quantities, but for just me and one other person it’s kind of an odd situation. I wanted turkey, but how are two people supposed to eat an entire turkey by themselves…? Unfortunately, I didn’t get my turkey. But I did make a fabulous roast chicken, twice-baked sweet potatoes, and Armen made his contribution of carmelized onions (thanks, Armen). I made a slightly adapted version of these bars as our Thanksgiving dessert. I cannot explain how badly I wanted pie, but Armen is picky/rude and vetoed both pumpkin and apple pie. I don’t want to talk about it. I was devastated. Also limited resources meant we had no pie pan, etc. etc. So we compromised and settled on pecan pie bars. Okay, to be fair, these were awesome. I really, truly enjoyed every bite of every one of these bars I ate (I ate at least…6 or 7? Oops) and would definitely make them again. I still resent them the teensiest, tiniest bit, but that’s just because I wanted a fall fruit pie so badly. In reality, these were really great. Make ’em.

1/2 c. butter, softened

1/2 c. brown sugar

1 c. flour

1 egg

heaping 1/3 c. honey

heaping 1/3 c. brown sugar

1 tablespoon maple syrup

1 tsp. vanilla

1 c. pecan halves

coarse salt to taste

Preheat the oven to 375. Cream the sugar and butter together until combined, then beat in the flour until the mixture becomes crumbly but sticks together when pressed. Press this with your hands into the bottom of an 8×8″ pan and bake for 10-15 minutes until the crust looks dry and a little bit puffy. While your crust is baking, whisk together the egg, honey, more brown sugar, maple syrup and vanilla. Once combined, stir in the pecans until coated and pour into the crust once it’s out of the oven. Rearrange the pecans a little if needed and stick it back in the oven for about 15 minutes, or until the filling is almost completely set. Remove from the oven and sprinkle with salt. Let them cool in the fridge (preferably overnight) before serving.

Image

Image

I know, OVERNIGHT? The horror. Your kitchen/entire apartment will smell so delicious after baking these, but you must resist the urge to eat them fresh out of the oven! They won’t hold together and you’ll be eating a weird, soupy mess. Although I considered trying a warm one, I used my will power and managed to wait. I was so proud of myself.

I tried these in a variety of ways (all in the name of blogging, of course……): once heated in the microwave topped with vanilla ice cream, a bunch of times just plain cold out of the fridge, and twice cold with vanilla ice cream on top. My personal favorite was definitely cold, paired with ice cream. No comparison. The ice cream makes the already cold bars even chewier, and the vanilla adds an amazing contrast to the maple-y, nutty goodness. You have to do a little bit of aggressive crushing with your spoon in order to get proper bites, but it’s worth the extra effort. The two servings of these bars I ate like this were consecutive; I simply could not stop at just one.

Make these for some holiday gathering or something! Or to bring to work! Or to share with friends! Or to keep all to yourself! Just make these. They’re festive and great.

Love, Emily